
Popsicle-Stick Organizer: Rainbow Puppy School Bus Craft for Kids
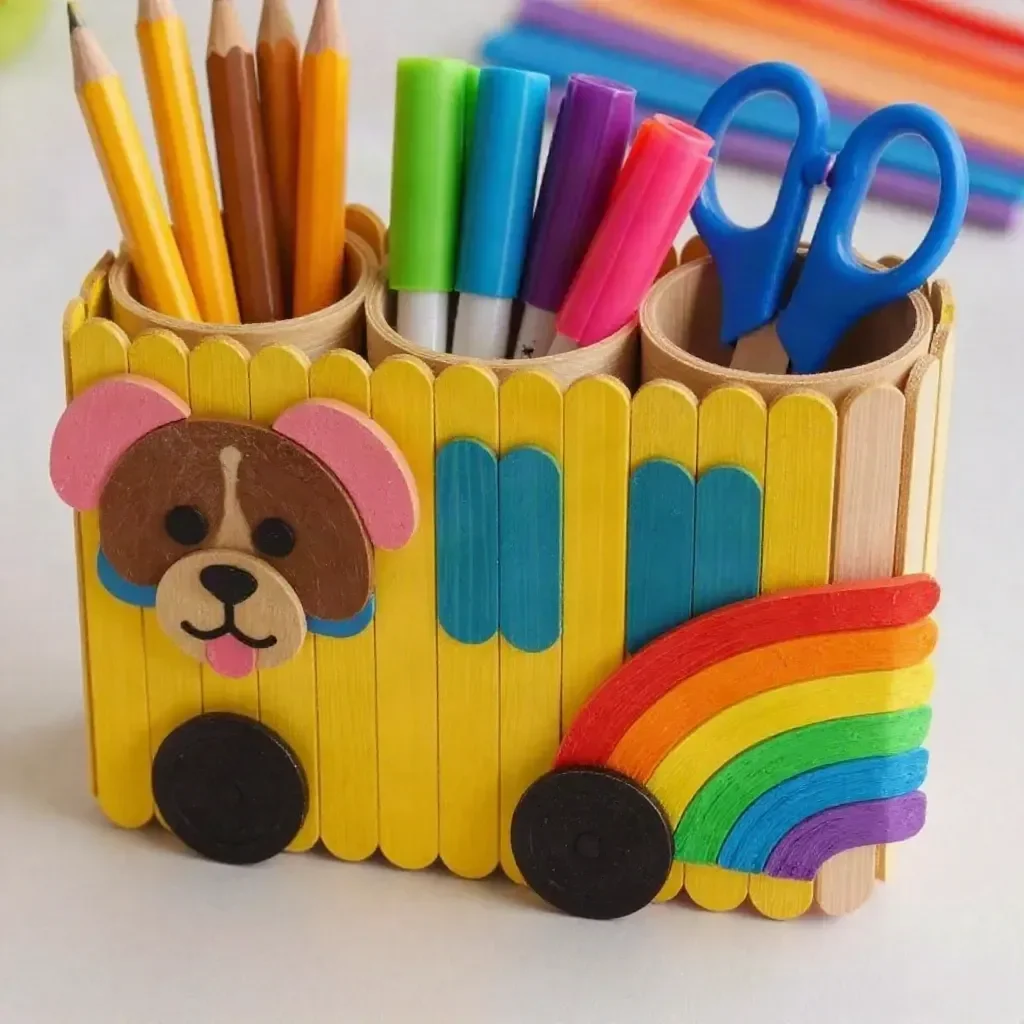
Looking for a fun way to organize your child’s school supplies? This Popsicle-Stick Organizer in the shape of a Rainbow Puppy School Bus is both colorful and functional! Made from simple materials like craft sticks and cardboard tubes, this craft provides an engaging activity for kids while offering a creative storage solution. The bright yellow bus, adorned with a cute puppy face and colorful ears, is an eye-catching addition to any desk. You may also find Rainbow Monster Pencil Holders Diy Craft For Kids useful.

Materials You’ll Need
Before diving into this fun project, gather the following materials:
- 25 jumbo craft sticks
- Yellow paint
- 3 cardboard tubes
- Rainbow cardstock
- Clear blue acetate
- Clear pink felt
- Brown felt
- Black buttons
- Glue
How to Make the Popsicle-Stick Organizer: Rainbow Puppy School Bus Craft for Kids
Creating this colorful school bus organizer is a straightforward process. Just follow these steps:
Step 1: Prep the Craft Sticks
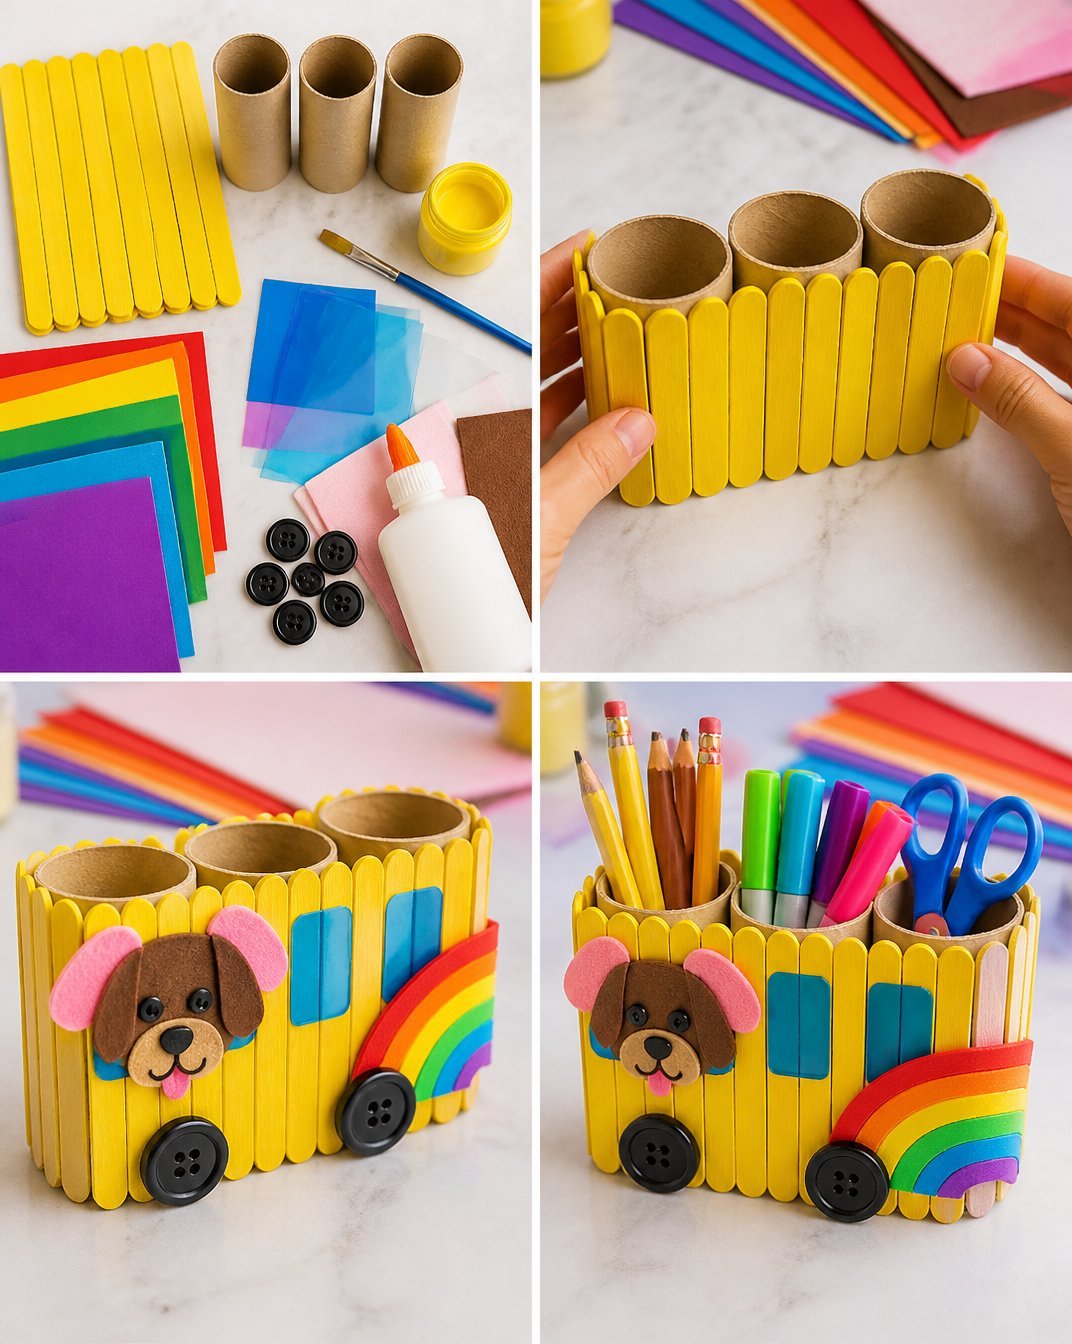
Start by painting all 25 jumbo craft sticks yellow. This bright color will form the body of our bus. Once the paint is dry, apply glue to attach the painted sticks around the three connected cardboard tubes. The tubes will serve as the compartments for storing supplies like pencils and markers.
Step 2: Add Windows and Wheels
Next, cut pieces of clear blue acetate to create windows for your bus. Adhere these behind the craft sticks to mimic the bus’s windows. For wheels, glue on the black buttons to each side of the cardboard tubes this adds an authentic touch that kids will love.
Step 3: Create the Puppy Face
Using the brown felt, cut out a simple puppy face. Attach this friendly face inside one of the bus windows. This whimsical element will charm any little ones and adds a unique twist to your organizer.
Step 4: Add Ears and Rainbow Details
To finish off the puppy’s face, cut out two ears from the clear pink felt. Glue these above the puppy face on the bus. For an added flair, you could incorporate some rainbow details from the cardstock to enhance the colorful look of your school bus. Check out this rainbow craft for more inspiration on how to use vibrant colors and patterns.
Step 5: Fill the Bus with Supplies
Finally, it’s time to load up your new organizer! Fill the cardboard tubes with school supplies like crayons, colored pencils, or markers. Enjoy how functional and adorable your new Rainbow Puppy School Bus looks on your crafting table or study space!
Helpful Tips
- Encourage kids to brainstorm other designs for their craft sticks to personalize their bus.
- If you’re working with younger children, consider supervising during the gluing and cutting steps to ensure safety.
Common Mistakes to Avoid
One common mistake is applying too much glue, which can lead to a messy finish. It’s better to use a thin layer of glue and let it set before adding more elements to your bus.
Ways to Customize It
Customization can make this craft even more special. Consider using different color palettes or patterns for the bus. You could also add stickers or drawings that represent your child’s interests or favorite characters. For example, create a design using cupcake liners from this sunflower wreath craft for an added touch of texture.
Crafting With Kids
This project is perfect for group craft time or a fun afternoon at home. Not only will kids enjoy the hands-on aspect of creating their own bus, but they’ll also feel a sense of pride in using something they made themselves.
Frequently Asked Questions
Q: How durable is the popsicle-stick bus?
The durability will largely depend on how securely the craft sticks and added elements are glued together. Using ample glue in a clean manner will ensure a sturdy finish.
Q: Can I use different sizes of craft sticks?
Absolutely! Although jumbo craft sticks work best for larger projects, feel free to adapt the design using regular-sized sticks to create a smaller bus.
Q: What other materials can be used instead of felt?
If you don’t have felt at hand, you can use other materials like construction paper or fabric scraps to form the puppy’s features.
Conclusion
Crafting with your kids not only provides a source of creative expression, but it also helps develop their fine motor skills. To explore additional engaging crafts for your children, check out these rainbow activities for kids. Enjoy making colorful memories together!
Print
Popsicle-Stick Organizer: Rainbow Puppy School Bus Craft for Kids
- Total Time: 40 minutes
- Makes: 1 organizer
Description
Create a colorful and functional Popsicle-Stick Organizer shaped like a Rainbow Puppy School Bus, perfect for organizing school supplies.
Materials
- 25 jumbo craft sticks
- Yellow paint
- 3 cardboard tubes
- Rainbow cardstock
- Clear blue acetate
- Clear pink felt
- Brown felt
- Black buttons
- Glue
Instructions
- Prep the craft sticks by painting them yellow and attaching them around the cardboard tubes.
- Add windows using clear blue acetate and glue on black buttons for wheels.
- Create a puppy face from brown felt and attach it inside one of the bus windows.
- Cut ears from clear pink felt and glue them above the puppy face.
- Fill the cardboard tubes with school supplies and enjoy your new organizer!
Notes
Encourage kids to personalize their bus and supervise younger children during glue and cutting steps.